Tutorial: Level Editing (Tile Collision, Pathing, Fans)
Gettin' Serious!
The last couple tutorials I've gone over how to add some basic things to a Sonic RPG level, but you're still missing some basic building blocks that I'll fill in now.
Tile Collision
Why did I wait till tutorial 3 to go over tile collision? I'm not really sure, honestly. In retrospect this probably would've been better to cover earlier, but as Antoine would say: "c'est la vie"!
The idea behind tile collision is pretty straight forward. You don't want to be able to walk across all map tiles. Tile collision allows you to define unwalkable terrain. This might be a building, or wall, or barrier, or some other kind of environmental boundary that isn't itself an object.

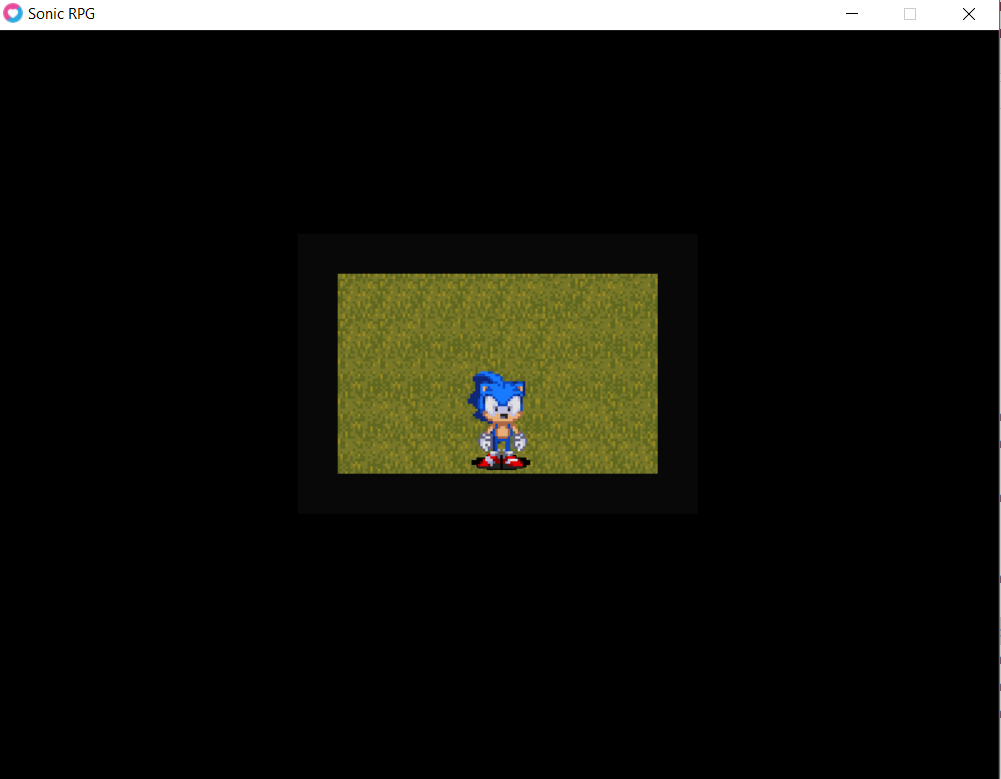
Remember how we created a "Collision" tile layer in the first tutorial? Well now it's time to use it! Simply put, any tiles you draw in the collision layer will be considered "unwalkable" terrain on the level. Here I've selected a black square from my tileset, to help clearly distinguish my collision from the other level tiles. I've then placed the player in the center of some grass and drawn collision around the outer edge. The player will now be spawned in the grassy area and will not be able to walk beyond its border.
When you finish drawing collision tiles, click the eyeball icon (next to the layer name) to hide this layer. This will ensure we do not draw the collision layer when playing the game.
When you finish drawing collision tiles, click the eyeball icon (next to the layer name) to hide this layer. This will ensure we do not draw the collision layer when playing the game.
Save your map, export the lua file, and give it a try!
Pathing
Last time I showed you how to create enemies that stand around and chase you if you're nearby. What if you want your enemy to patrol?
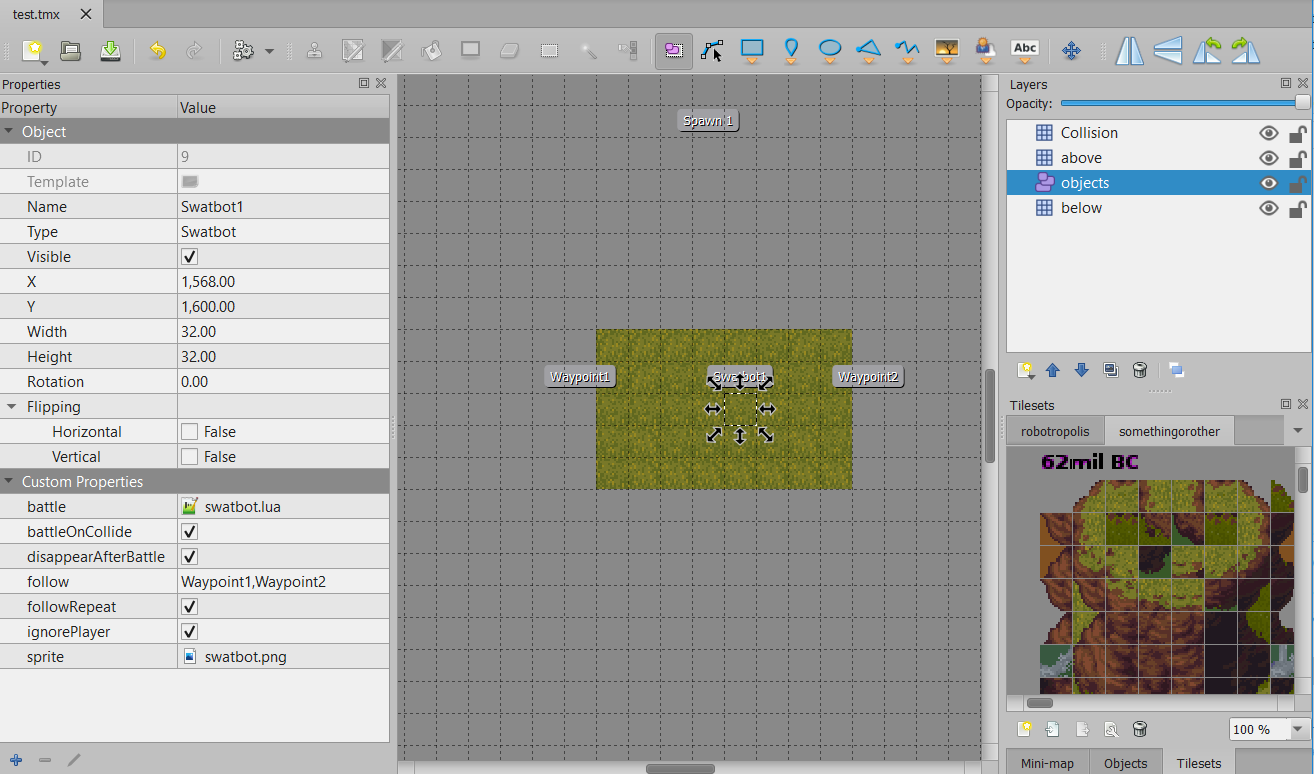
Luckily, it's pretty simple. Just create objects on the map to represent the points of the path you want your bot to walk along. Path objects are very simple. All you need to do is set their name to something unique, use the "BasicNPC" type, and then create a bool custom property called "ghost" and set it to true.

Once you've done that, select the enemy object whom you want to update the path of. Create a string property called "follow" and set the value to a comma-separated list of path object names.
In this case, we have two path objects named "Waypoint1" and "Waypoint2", so the value of the "follow" property should be "Waypoint1,Waypoint2".
In this case, we have two path objects named "Waypoint1" and "Waypoint2", so the value of the "follow" property should be "Waypoint1,Waypoint2".
Next create a bool custom property called "followRepeat" and checkmark it.
NOTE: If you want to make things easier to test, add another bool custom property named "ignorePlayer" and checkmark it. This prevents the bot from seeing/chasing you so you can more easily observe it's patrolling behavior.
NOTE: If you want to make things easier to test, add another bool custom property named "ignorePlayer" and checkmark it. This prevents the bot from seeing/chasing you so you can more easily observe it's patrolling behavior.
Save your map and export the lua file and test it out!
Fans
As you probably saw in the 2020 demo of SonicRPG, fans provide a way to kill enemies in the level without you having to battle them! Fans can either start active or be activated by a switch.
Let's start off with a basic fan that's running without a switch. Create an object of type "Fan" and make it 4 tiles wide. Add two custom properties to it. The first is a string property called "align", which should be set to "bottom_left". The second should be a bool property called "on", and it should be checkmarked.

Now save your map and export the lua file and test it out! You should see a running fan in your level.
To make your fan start in a deactivated state, and require a switch to activate, uncheck the "on" property. Make a new object of type "Switch" and add three custom properties.
A string property named "align" and set the value to "bottom_left", a file property named "sprite" should be set to the png file at "art/sprites/switch.png" in the source code directory, and another string property named "subject" which should be set to the name of our fan object (in this case, "Fan1")

Save your map and export the lua file and test it out!

That covers most of the basics, I think. Next time I think I'll do a video of myself creating a level which utilizes all of these components, from start to finish.


Comments
Post a Comment